Indian Comfort Food

Those of us with food sensitivities often are confronted with social food situations where we know “if I eat any of this, I’ll be sorry later” . . . but we want to be polite.  So we pick the things that seem “relatively safe.”  I’m pretty good at avoiding the likely culprits.  And lucky for me, I won’t end up in the hospital if I am accidently exposed to gluten, dairy, or corn.  But that doesn’t mean I won’t suffer: intestinal distress (gluten), sinus trouble (dairy), hives (corn).

My choice when I need to rebalance and cleanse my system is what I call Indian Comfort Food, two ayurveda-inspired porridges that soothe and restore: Kichari (aka kitchari, khichdi, and many other variations) and Savory Farina.  Try one or both of these recipes and your body will thank you!  (Recipes adapted from information obtained at an Ayurvedic Cooking class at Health Through Ayurveda.)

Kichari

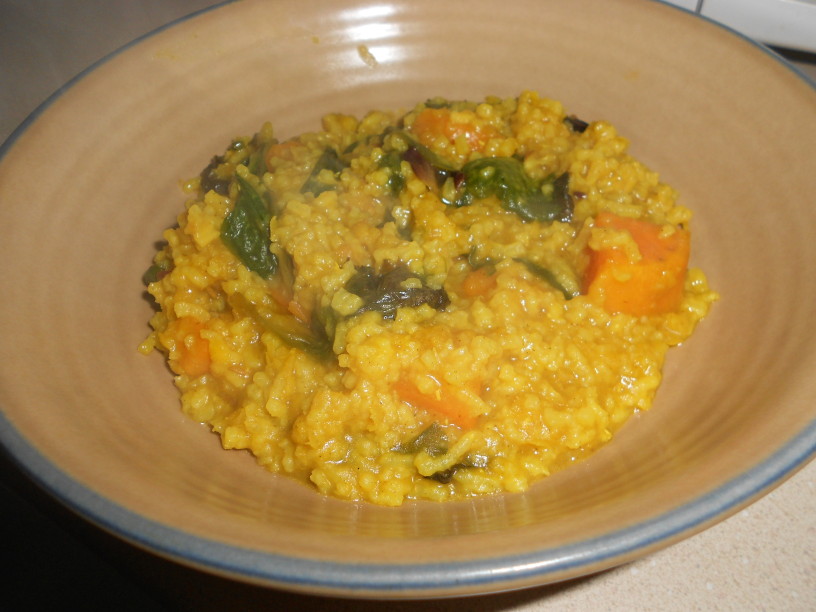
Kichari with Sweet Potato and Chard

Ingredients

  • 1/2 cup split yellow lentils (moong dal) or red lentils (masoor dal)
  • 1 cup white basmati or long-grain rice
  • 6 cups boiling water
  • 1-2 Tablespoons oil or ghee (I use coconut oil)
  • 1 teaspoon cumin seeds
  • 2 Tablespoons fresh ginger, grated
  • 1 pinch baking soda
  • 1 teaspoon ground cumin
  • 1 teaspoon ground coriander
  • 1 teaspoon turmeric
  • 1 cinnamon stick (or 1/2 teaspoon ground cinnamon)
  • 8 cloves (or 1/8 teaspoon ground cloves)
  • 10-12 cardamom pods (or 1/4 teaspoon ground cardamom)
  • 1 large sweet potato, peeled and chopped into bite-sized pieces
  • 4 cups chard (swiss, red, or rainbow, about 1/2 bunch), stems removed, sliced or torn into bite-sized pieces
  • Salt to taste

Directions

  1. Rinse split lentils until water runs clear. Soak 4 hours or overnight; drain and rinse.
  2. Get water boiling if it isn’t already.
  3. Warm oil in large sauce pan or Dutch oven. Add cumin seeds and ginger and sauté for 1 minute. Add drained lentils. Sauté for another few minutes. Add 4 cups of boiling water and pinch of baking soda. Bring to a boil and then turn down heat to low. Cover and simmer for 20 minutes.
  4. Meanwhile measure out remaining spices (cumin, coriander, turmeric, cinnamon, clove, cardamom), prepare sweet potato, and rinse rice.
  5. When beans are mostly cooked (after about 20 minutes), add rice and sweet potatoes. Add remaining 2 cups boiling water.
  6. In a separate small pan, heat 1 Tablespoon oil. Add spices. Warm over low heat just long enough to release aroma. Be careful not to burn.  Add to bean/rice/sweet potato mixture.
  7. Continue cooking at a simmer until rice is done, 20-30 minutes, stirring occasionally.
  8. Add chard. Cook until greens are wilted and combined with the rest of the ingredients (5-10 minutes).
  9. Salt to taste.
  10. Enjoy!

[slideshow_deploy id=’1105′]

Notes

  • The original recipe called for a pinch asafoetida (hing) added with the cumin seeds.  I tried to find hing that didn’t also include gluten and/or corn starch.  Unfortunately, my body reacted to the one product I found that said it was gluten-free in a way that told me there was something in it that I shouldn’t be eating . . . so even though this is a traditional “healling” ingredient in Indian/Ayurvedic cooking, I omit it.
  • If you can’t find small split lentils, you may be tempted to use regular split peas (yellow or green).  Unfortunately, those require MUCH longer to cook.  I’m really not sure how to best modify this recipe to use them.  There may be other kichari recipes on the web that use those larger split peas. (See slideshow above for a picture comparing the different types of lentils.)
  • Kale, spinach, or other leafy greens can be substituted for the chard.
  • Sometimes I heat all the spices at the beginning (with the cumin seed and ginger) rather than waiting until later.  The flavor is a bit different and there’s a greater danger of burning the spices, but it can work (and leaves one less pan to wash and frees up one more burner).
  • The original recipe claimed that this recipe “Serves 2-3.”  I usually get 5-6 serviings out of it.
  • [2021 update] I never figured out what the baking soda was supposed to be doing, so I now omit it and add 1/2 tsp of Ajwain instead. Ajwain is an Indian seed that “tempers the effects of a legume based diet” 🙂

Hearty Breakfast Farina (Uppma)

Savory Hot Farina

Ingredients

  • 1 cup boiling water
  • 1/4 cup brown rice farina (I use Bob’s Red Mill “Creamy Brown Rice Farina”)
  • 1/2 cup vegetables (I use 1/4 cup finely chopped carrots and 1/4 cup frozen peas)
  • 1-1/4 tsp Breakfast Spice Blend (see below) (OR 1/2 tsp coriander, 1/4 tsp cumin, 1/4 tsp turmeric, and 1/4 tsp cinnamon)
  • 1 Tablespoon coconut oil or ghee
  • Salt & Pepper to taste

Directions

  1. Start the water boiling in your kettle.
  2. In a small cast iron or non-stick pan over medium heat, lightly the brown rice farina, stirring frequently until the farina is light brown in color.  Remove toasted farina to a bowl and set aside.
  3. Melt the coconut oil or ghee in the pan over low heat.  Add the Spice Blend.  Let spices warm for 10-15 seconds.  Add vegetables and a small amount of water.  Stir. Cover and cook vegetables for 5-7 minutes.
  4. When the vegetables are cooked, add the toasted farina and stir to coat.
  5. Add 1 cup boiling water and a dash of salt.
  6. Cook for approximately 5 minutes, stirring frequently as farina thickens.
  7. Enjoy with a cup of Chai Tea!

Breakfast Spice Blend (makes approx 1/4 cup, enough for 6 individual servings)

  • 2 Tablespoons ground coriander
  • 1 Tablespoon ground cumin
  • 1 Tablespoon ground turmeric
  • 1 Tablespoon ground cinnamon

Combine all the spices in a glass jar.  Use 1-1/4 teaspoons (or a heaping teaspoon) for each serving.

Notes

  • I’ve only made this dish one serving at a time, but it should work if the ingredients are doubled/tripled/quadrupled.  You might need to adjust water quantity, spice quantity, and/or cooking times.  [2021 update] I now always double this recipe (so 2 cups water, 1/2 cup farina, 1 cup veggies, 2-1/2 tsp spice blend all in a slightly larger pan or sauce pan). Works fine and somehow doubling gives me 3 servings instead of two.
  • Other vegetable options: chopped onion, minced ginger, chopped yam or sweet potato, asparagus, leafy greens, or whatever else sounds good.
  • I’m guessing this dish could be made with other grains (e.g., wheat farina or grits), but I haven’t tried that.  You might have to adjust cooking times.
  • [2021 update]  I’ve also made the double recipe with 2 cups of leftover cooked rice instead of the farina (reduce the water).  And I sometimes throw in a couple of scrambled eggs to make a really yummy Rice Bowl.

WOW!  That’s quite a bit of information.  Please let me know (in the comments) if anything needs clarification.

Share

Apple Cake

Apple Cake

gluten-free, dairy-free, vegan, corn-free

DSCN3682

Today I baked the latest in my attempts to develop a gluten-free version of my old favorite “Raw” Apple Cake with Cream Cheese Frosting. This time I used Cybele Pascal’s Allergy Free French Apple Cake as a place to start. Her main innovation is pre-cooking the apples.  I added raisins, walnuts (so no longer “top allergen free”), and spices (so less French, more American) to her recipe and made several other changes to make it corn-free. Below is what I did. Consult the links above for the original recipes.

Ingredients

  • 3 medium baking apples (approx. 1 lb.), peeled, cored, cut into 8 wedges, and then sliced crosswise (I used Cortland apples and ended up with 3 cups of apples)
  • 2 teaspoons brandy (optional; I had Grand Marnier, so used that)
  • 3/4 teaspoon lemon juice
  • 3 Tablespoons flax seed meal
  • 1/2 cup warm water
  • 2 cups Authentic Foods GF Classical Blend or my Basic GF Flour Blend
  • 1/2 teaspoon guar gum
  • 3/4 teaspoon baking soda
  • 1-1/2 teaspoons cream of tartar
  • 1 teaspoon salt
  • 1 teaspoon ground cinnamon
  • 1/2 teaspoon ground allspice
  • 1/4 teaspoon ground cloves
  • 3/4 cup shortening (I use Spectrum Organics Palm Oil Shortening)
  • 3/4 cup firmly packed light brown sugar
  • 1/2 cup granulated sugar
  • 1 teaspoon vanilla extract
  • 3/4 cup diluted coconut milk (see notes below)
  • 1/2 cup walnuts
  • 1/2 cup raisins

Directions

  1. Place apple slices in a microwave-safe pie plate, cover, and microwave 3 minutes or until apples are slightly tender and pliable. Toss with brandy and lemon juice, and set the pie pan on a wire cooling rack to cool.
  2. Preheat oven to 350°F. Line a baking sheet with aluminum foil. Grease a 9-inch springform pan. Line the bottom of the springform pan with a 9″ round piece of parchment paper and grease the parchment paper. Sprinkle the sides and bottom of the pan with a little gluten-free flour mix, tapping out any extra, and place the springform pan on the baking sheet.
  3. In a small bowl, combine flax seed meal with warm water. Set aside for 5-10 minutes, stirring occasionally.  It should thicken into a gel similar in consistency to eggs.
  4. In a medium bowl, whisk together the flour mix, guar gum, baking soda, cream of tartar, salt, cinnamon, allspice, and cloves. Set aside.
  5. In a large bowl (or the bowl of a stand mixer), combine shortening, light brown sugar, and granulated sugar. Mix on medium-high speed until well combined.
  6. Add flax seed mixture and vanilla. Mix until blended.
  7. Reduce the speed to medium and beat in one-third of the flour mixture. Mix until blended.
  8. Add half the coconut milk, mix until blended.
  9. Mix in half of the remaining flour mixture, then the remaining coconut milk, and finally the remaining flour mixture, scraping down the sides of the bowl as necessary.
  10. Using a wooden spoon or rubber spatula, fold in the walnuts and raisins. Then gently fold in the cooled apples.
  11. Pour the batter into the springform pan; spread to the edges of the pan and smooth the top.
  12. Bake for approximately 60-75 minutes in the center of the preheated 350°F oven, until the center of the cake is firm and a toothpick inserted into the cake comes out clean. Cool for 10 minutes on wire rack. Loosen the outside of the springform pan and gently release, using a small knife to separate the edge of the cake from the edge of the pan, if necessary. Set the cake, still on the pan bottom, on a wire rack to cool completely, at least 1 hour.

[slideshow_deploy id=’1036′]

Notes

  • My everyday dairy-free “milk” is diluted coconut milk.  I take a 14 oz. can of Aroy-D Coconut Milk (according to the information on the can this brand is made from only coconut and water, not preservatives or additives), pour it into a 1-quart container, add 14 oz. of water, and shake.  So a 50/50 mixture of coconut milk and water.  Feel free to substitute whatever form/brand of dairy-free milk you like.
  • My original Apple Cake recipe included Cream Cheese Frosting.  I’ve chosen not to frost today’s cake, but if I did I would use the following recipe:

Coconut Manna Frosting

  • 3/4 cup dairy-free shortening
  • 2 heaping Tablespoons Coconut Manna (I use Nutiva Brand)
  • a pinch of salt
  • 2-1/2 – 3 cups of confectioners’ sugar (I use Wholesome Sweeteners Organic Powdered Sugar because it is free of cornstarch)
  • 1 teaspoon vanilla
  • 3 – 4 Tablespoons diluted coconut milk, as needed for smooth consistency

Cream the shortening, coconut manna, salt and vanilla until smooth.  Add the confectioners’ sugar in several batches, beating until smooth after each addition.  Add the coconut milk, one tablespoon at a time until the frosting is the consistency you prefer.  Continue beating until smooth, light, and fluffy.  Makes enough for 12 large cupcakes, an 8″ layer cake, or the top and sides of a 9″ single-layer cake.

©2014 Highly Sensitive Girl / Lucinda DeWitt

Share

Marinated Quinoa Salad

Marinated Quinoa Salad

For years my go-to summer salad was my take on “Marinated Pasta Salad” from Mollie Katzen’s The Enchanted Broccoli Forest cookbook.  Of course, one could modify that recipe to use rice pasta (gluten free) and leave out the mozzarella cheese (dairy free), but for July 4th this year I made a few additional tweaks and came up with Marinated Quinoa Salad.  Many of the same flavors and refreshing taste, but without the food allergies!

Marinated Quinoa Salad

45 minutes to prepare, plus time to chill
Makes 4-6 servings

Ingredients

  • 1 cup dry quinoa, rinsed
  • 2 cups water
  • 1/2 bunch kale
  • 1/2 medium red onion, finely diced
  • 1 jar or can artichoke hearts (8-15 oz., see note below), coarsely chopped
  • 1/2 cup (packed) finely minced parsley
  • 3 Tablespoons olive oil
  • 3 Tablespoons red wine vinegar
  • salt and pepper to taste
  • basil (1 Tablespoon fresh or 1 teaspoon dry) or other herb blend (I used Pasta Sprinkle from penzeys.com)

Directions

  1. In a 1 quart saucepan with a lid, boil the water.  Add the rinsed quinoa, stir, lower the heat, and simmer for 15 minutes or until tender.  Allow the quinoa to cool.
  2. Clean the kale by removing the leaves from the stems.  Rinse the leaves in a bowl of water and tear them into large, bite-size pieces. In a large pot with a lid, heat about one inch of water to boiling.  Add kale and steam/blanch for 2-3 minutes until tender.  Toss with tongs a couple of times during the cooking.  Remove to a bowl of cold water to stop the cooking process.  Drain thoroughly and chop into smaller bite-size pieces.
  3. Add kale, red onion, artichoke hearts, and parsley to quinoa.  Toss.
  4. Add oil, vinegar, salt & pepper, and basil or herbs.  Toss
  5. Chill for at least 30 minutes.

Notes

  • Quinoa is a high-protein, gluten-free grain-like seed gaining in popularity in the US, but ancient in origin.  Several varieties are available.  I buy the dark-beige variety in bulk at the Seward Co-op.  It requires only a quick rinse in a sieve before cooking.  Other varieties may require longer rinsing, soaking, and/or cooking times.  Follow the directions for your quinoa.  You should end up with approximately 2 cups cooked quinoa.
  • Most artichoke hearts seem to be processed with ingredients that are likely to be corn-based (e.g., citric acid, “spices”).  If you are sensitive to corn, use your judgment.  I find that if I drain the marinated artichoke hearts, I don’t have much, if any, reaction.  I haven’t tried the canned variety (with the citric acid), but would drain and rinse those before using. Feel free to substitute some other vegetable (green peppers, broccoli, carrots).
  • You could use the kale raw and be just fine.  I find a few minutes of blanching heightens the color and makes it easier to digest.


Share

GF Carrot Cake Redux

After my successful Carrot Cake BakeOff in March, I decided to combine the best of the two recipes and made a “new and improved” two-layer carrot cake for my birthday.

Gluten-Free Carrot Cake

Full Batch = two 9″ rounds; Half Batch = one 9″ round

Ingredients

Full Batch Ingredient Half Batch
2-1/2 cups Cake & Pastry Blend (see below) 1-1/4 cups
1-1/2 teaspoons baking soda 3/4 teaspoon
1 teaspoon baking powder 1/2 teaspoon
1-1/2 teaspoon cinnamon 3/4 teaspoon
1/4 teaspoon nutmeg 1/8 teaspoon
1/4 teaspoon ground cloves 1/8 teaspoon
1-3/4 cups sugar 7/8 cup
1 cup vegetable oil 1/2 cup
3 eggs eggs 2 eggs [my modification to avoid 1/2 egg]
1 teaspoon pure vanilla extract 1/2 teaspoon
8 oz. can crushed pineapple, drained with juice reserved 4 oz. (1/2 can)
4 Tablespoons reserved pineapple juice 1 Tablespoon [modified due to additional egg noted above]
2 cups peeled & grated carrots 1 cup
3/4 cup raisins 3/8 cup
1/2 cup chopped walnuts 1/4 cup
1/2 cup unsweetened coconut, rehydrated with 1-2 tablespoons of water 1/4 cup

Directions

  1. Preheat the oven to 350°F.  Grease 8- or 9-inch round cake pan(s).  Line with bottom of the pan with parchment. Lightly grease the parchment. [I buy 9″ round  parchment sheets rather than cutting my own.]
  2. Combine the flour blend, baking soda, baking powder, cinnamon, nutmeg, and cloves in a bowl; set aside.
  3. Prepare all the add-ins: carrots, raisins, walnuts, coconut, pineapple.
  4. In a large mixing bowl, beat the sugar, vegetable oil, eggs, and vanilla at low speed until smooth, then beat at high speed for 3 minutes.  Add the flour mixture and beat on low speed to blend.  Add the reserved pineapple juice and beat until smooth.  Stir in the carrots, pineapple, raisins, walnuts, and coconut.  (I do these additions by hand with a wooden spoon, rather than with the mixer.)
  5. Divide the batter between the cake pans.  Bake on the center rack for 40-45 minutes, until the cake begins to pull away from the sides of the pan and a toothpick inserted in the center comes away clean. [Do make sure the center seems “solid” or the whole thing is likely to collapse as it cools.]  Remove to a wire rack and cool for 15 minutes.  Turn the cake out onto a rack to cool completely.  [You may need to run a knife around the edge of the pan.  I also put a sheet of parchment over the rack so the cake doesn’t stick to the rack.]
  6. Frost with non-dairy Coconut Powdered Sugar Frosting (see below) or your favorite frosting.

Note

  • I use these velcro cake pan insulating strips to keep the cake from doming.  They work great!  However, it’s possible that without them your cake will be done sooner . . . so remember to start checking after 30 minutes of baking.  Better safe than sorry!


Cake & Pastry Blend

(adapted from Hillson, Gluten-Free Makeovers)

  • 1-1/4 cup sorghum flour
  • 1 cup superfine brown rice flour
  • 1/2 cup tapioca starch
  • 1-1/2 teaspoons guar gum
  • 1/2 teaspoon salt

Whisk all the ingredients together in a bowl.  Store in a plastic zipper bag in the refrigerator until needed.

Notes on Flour Blends:

  • DO NOT use the old “scoop and level” method of measuring with GF flours.  You will get too much flour.  Spoon the flour into your measuring cup, then level off excess with a knife.
  • Obviously, this recipe makes more than the 2-1/2 cups needed for the carrot cake recipe.  Remember to mix the blend, then measure for the recipe.  Save the leftovers for other baking.
  • If you use any other flour blend you will need to add gum and salt to the carrot cake recipe.

Lucinda’s Non-Dairy Coconut Powdered Sugar Frosting

(Update 10/6/2014: I no longer use these proportions in my frosting.  Please see my current recipe at http://highlysensitivegirl.com/hsgblog/2014/10/04/apple-cake/#frosting )

  • 1/2 cup vegetable shortening (I use Spectrum Organics Palm Oil Shortening)
  • 2 Tablespoons Coconut Manna (I use Nutiva brand; https://store.nutiva.com/coconut-manna/)
  • 2-3 cups confectioners sugar; sifted if lumpy
  • 1 teaspoon pure vanilla extract
  • 1/2 teaspoon lemon extract
  • dashes of lemon juice or water or “milk” substitute as needed to thin the frosting
  1. Beat the shortening and coconut manna until light and fluffy.  Add extracts and beat again.
  2. Gradually add confectioners’ sugar and mix at low-medium speed until combined.
  3. Add liquid, one teaspoon at a time, to thin the frosting enough to use.

Notes

  • The coconut manna provides some richness to make up for not using the butter and cream cheese that would be in the traditional version of my powdered sugar frosting.
  • For some reason this recipe wasn’t quite enough to frost the cake today.  Haven’t gotten the proportions correct after years of making cream cheese frosting.  I think this needs more shortening, so next time I’ll try 3/4 cup shortening and maybe an extra spoon of coconut manna.


Share

B is for Baseball, Brats, Buns

Thursday was the start of the baseball season (at least for Chicago Cubs fans).  I knew I was going to have to figure out a GF, DF, and corn-syrup-free alternative to Hot Dogs/Brats . . . turned out to be trickier than I expected.  According to the guy at my local meat counter, in order to be a “brat,” and not some other kind of sausage, the sausage must contain milk . . . who knew?  Not me.  Seward Co-op has a great meat department where they make their own sausages, most of which I can eat . . . my favorite are Umbrian (with raisins & pine nuts) and Lime-Mango Chicken Sausage, but neither of those will do as a substitute for a baseball brat, and no-go on dairy-free brats  . . . so I ended up buying Polish Sausages instead.

I sautéed some onions and peppers and served the sausage over rice with the onions & peppers . . . but it wasn’t quite what you want to accompany a ball game.  So this morning I decided to try to bake some Gluten-Free Hot Dog Buns.  I used Annalise Roberts’ recipe from Gluten-Free Baking Classics.  The pan I have is an Italian Bread pan (rather than the thinner baguette pan recommended in the recipe) . . . so the buns were a bit flat . . . but they worked!!

So this afternoon I had sausage/onions/peppers on a GF bun while listening to the Twins game on the radio . . .

Sausage on a GF Bun

To paraphrase Field of Dreams:
Is this heaven?
No, it’s baseball.
No contradiction intended.

Share