Adventures in Soy Milk (or is it Soymilk?)

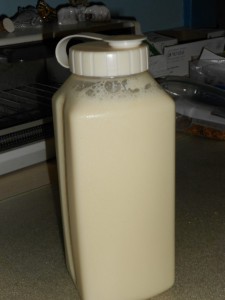
One Quart of Homemade Soy Milk

A few weeks ago my favorite soy milk (Edensoy Organic Unsweetened Soymilk made with only soybeans and water) became unavailable, both locally and from the distributor.  SO, after trying to live with another brand (which contained additives that gave me headaches) and locating yet another brand (Westsoy Organic Unsweetened) that was only soybeans and water (but cost $4/quart!), I decided to try my hand at making homemade soy milk.

I tried three different methods (though I’ll mention four methods below) with varying degrees of success.  I’ll start with the method I liked the best, and then present the other methods with a discussion of what I didn’t like about them.

Some good news: (1) Edensoy Organic Unsweetened Soymilk is now back at my local coop and (2) making your own soy milk can be easy and inexpensive!

Soymilk Method #1—Soak, cook, blend

(adapted from: http://www.tinyurbankitchen.com/2012/02/homemade-soy-milk.html )

You will need:

  • 3/4 cup raw soybeans
  • water
  • 3-qt oven-safe pan with lid
  • blender
  1. Rinse and pick through 3/4 cup of raw soybeans.
  2. Cover in water and soak for 8-24 hours.  (I wouldn’t leave it out of the frig for that long, but a combination of time on the counter and time in the frig is fine.  You may also want to change the water depending on how long you soak the beans.)
  3. Drain the beans.  Pick through the soaked beans, removing any “duds” (beans that didn’t expand during soaking).  Rinse.
  4. Put the soaked beans and 6 cups of new water into a 3 qt. oven-safe pan with a lid.  Bring to a boil on top of the stove.  While the beans are coming to a boil, preheat oven to 350°F.  Once the beans come to a boil, transfer the covered pan of beans to the oven.  Cook the beans in the oven for 70-90 minutes, or until tender.  Remove from oven and let sit on top of the stove in their cooking water until you are ready to blend them.  (I would let the cool for at least an hour to avoid the “exploding-blender problem” that can happen if you try to blend something very hot.)
  5. Drain the beans.  Combine 1 cup cooked beans with 2 cups water in in blender.  Puree until very smooth.  Repeat with remaining beans and water in a ratio of 1 cup beans : 2 cups water.  (I wouldn’t put more than that in a blender unless you have a super-turbo-charged type of blender.)
  6. (optional) Strain the soymilk through strainer sieve.

Enjoy!  (Yield: approximately 6 cups)

Soymilk Method #2—Soak, blend, sieve/strain, cook

(adapted from: http://www.tastehongkong.com/recipes/homemade-soy-milk-tricky-yet-easy/ )

You will need:

  • 3/4 cup raw soybeans
  • water
  • blender
  • large, 2-3 quart, sauce pan
  • colander
  • cheesecloth or large, thin, cotton dishtowel
  1. Rinse and pick through 3/4 cup of raw soybeans.
  2. Cover in water and soak for 8-24 hours.  (I wouldn’t leave it out of the frig for that long, but a combination of time on the counter and time in the frig is fine.  You may also want to change the water depending on how long you soak the beans.)
  3. Drain the beans.  Pick through the soaked beans, removing any “duds” (beans that didn’t expand during soaking).  Rinse.
  4. Combine 1 cup of the soaked beans and 2 cups water in a blender. Pureé until smooth.
  5. Place colander in/over sauce pan and line with cheesecloth/dishtowel.
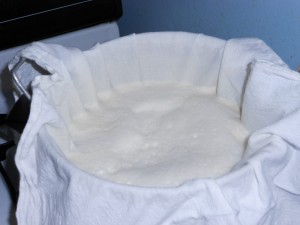
  6. Pour the foamy bean pureé through the cloth-covered colander.  Allow it to drain slowly while you pureé the next batch of beans/water. (See Photo A below.)
  7. Once all of the bean pureé is poured into the colander, lift all the sides of the cloth, forming a closed bag over the colander, squeeze the remaining soy milk through the cloth and into the sauce pan.  When you’ve extracted as much liquid as possible from the pulp, remove the colander and the cloth bag.
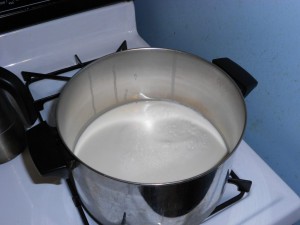
  8. Over medium heat, bring the soy milk in the sauce pan to a boil.  Stir occasionally to avoid scorching and check frequently to avoid “over-foaming” of the pan.  Once the soy milk comes to a boil, lower the heat and continue to cook for 15-20 minutes, stirring frequently. (See Photo B below.)
  9. Serve hot or chilled.
Straining the Soy Milk

Photo A: Straining the Soy Milk

Cooking Soy Milk

Photo B: Cooking Soy Milk

Enjoy! (Yield: approximately 1 quart)

Notes on Method #2

  • My main complaint about Method #2 is that the beans don’t seem cooked enough.  I don’t digest beans well in the first place, and this soy milk left me with that “gassy discomfort” that can accompany eating beans.  (I did not have the same problem with the soy milk I made using Method #1.)
  • I’m not entirely sure all the sieving/straining is necessary.  I suppose it depends on what you use the milk for and how smooth you want it to be; to me it was too time consuming.

Soymilk Method #3—Soy Milk from Soy Flour

(adapted from: http://www.thumboilseed.com/soy-milk.htm )

I actually tried this method first, thinking it would be quicker and easier . . .

You will need:

  • 1 cup soy flour
  • water
  • large, 2-3 quart, sauce pan
  • colander
  • cheesecloth or large, thin, cotton dishtowel
  1. Bring 3 cups water to a boil, then slowly add 1 cup soy flour (do not use toasted soy flour), stirring constantly with a whisk to prevent lumps.
  2. Reduce heat and simmer for 20 minutes, stirring occasionally.
  3. Line a colander with cheesecloth and place over a large bowl or pot. Strain the soy flour mixture through the lined colander.

Notes on Method #3

  • I allowed the cooked soymilk to cool before I tried straining it.
  • Using this method I ended up with only 1 cup of soy milk!  The liquid reduced to about 2 cups during cooking and then I had a difficult time getting the cooked mixture through cheesecloth/dishtowel . . .Given the price of soy flour, this is not cheaper than buying soy milk at the store.

Soymilk Method #4—Soak, blend, cook, sieve/strain

I did not try this method, because I didn’t want to mess with straining hot liquid with my hands.  Basically, it is the same as Method #3, but you cook the blended soybean mixture first and then strain it afterward.  I found this method recommended  at: http://kissmyspatula.com/2009/12/20/fresh-homemade-soy-milk/  and  http://www.lafujimama.com/2009/09/how-to-make-tofu-no-fancy-equipment/

Final Note:  One downside of all these methods is that homemade soy milk doesn’t last very long in the frig (3-4 days before it started tasting “funny”).  I only go through about 1 quart/week, so to do all this work every few days seems like too much for me.  It’s possible that the soy milk could be frozen, but I haven’t tried that.


Share

Cranberry Pecan Salads

Cranberry Pecan Salads

In September 2012, I trekked 25 miles to Valley Natural Foods in Burnsville, MN to get some gluten-free flour.  While there, I discovered what a great selection of gluten-free and dairy-free items they have, including items in the deli counter (clearly labeled as GF and DF!).  Needless to say, I came home with much more than my GF Superfine Brown Rice Flour.  Two of the deli salads were particularly yummy—Cranberry Chicken Salad and Raw Squash Salad with Craisins and Pecans.  Tonight I made a variation of my own, Spaghetti Squash with Craisins and Pecans, though at the last minute mine became a hot dish rather than a salad.  So here are three variations on the “Salad/Side-dish with Cranberries and Pecans,” beginning with the dish I made tonight, followed by my the Valley Foods dishes.

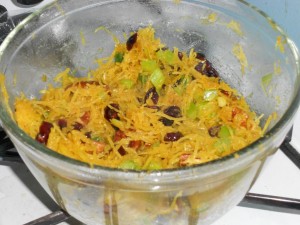
Spaghetti Squash with Craisins and Pecans

Spaghetti Squash with Craisins and Pecans

  • 1/2 spaghetti squash, seeded & baked (see note below on spaghetti squash)
  • 1 rib celery, diced
  • 1 scallion, finely sliced
  • 1/3 cup craisins
  • 1/3 cup pecans
  • 1/2 teaspoon curry powder
  • dash of paprika
  • salt & pepper to taste

Using a fork, remove the flesh from the squash.  (As the name implies, it will come out in spaghetti-like strands, you may wish to cut them into smaller, bite-sized pieces.) In a medium bowl, combine all the ingredients.  Toss together.  Enjoy!

Notes

  • I used leftover spaghetti squash baked as I bake most squash: cut in half lengthwise, remove seeds and pulp (but not the “flesh”) of the squash, spray the raw side lightly with oil, place raw side down on a baking sheet.  In a 375°F oven, bake for 45-60 minutes (or until fork tender), remove, allow to cool. Enjoy!
  • Tonight I decided I wanted this dish hot, rather than cold.  I tossed together the ingredients without the craisins and pecans, heated the squash mixture in a bit of oil in a medium sauté pan until the spices were fragrant, then added the craisins and pecans, tossed and ate with rice.
  • I can think of many variations on this dish:  add a diced apple, change out the curry powder for “poultry seasoning” (a mixture of sage, rosemary, thyme, and marjoram), etc.  The curry powder and the texture of the squash actually made this dish taste like “Singapore noodles,” so I can imagine swapping the cranberries and pecans for carrots, bean sprouts and bok choy.  The possibilities are endless!!

Raw Squash Salad with Craisins and Pecans

from http://valleynaturalfoods.com/wordpress/2010/12/06/favorite-holiday-recipes/

  • 3/4 C. chopped pecans
  • 2-1/2 lbs. finely shredded raw butternut squash (peeled and seeded first)
  • 1 C. finely diced yellow onion
  • 2 C. craisins (dried cranberries)
  • 1/3 C. freshly chopped cilantro
  • 1-1/2 Tbsp. ground coriander
  • 1-1/2 Tbsp. ground cumin
  • 1/2 Tbsp. sea salt, or to taste

Place pecans in a bowl and cover with water. Allow pecans to soak at room temperature for 1 hour. Shred squash in food processor fitted with fine shredding blade, or shred by hand with grater (should appear small and “rice” like). Drain water off pecans and combine with squash and remaining ingredients. Toss well and chill before serving.

Cranberry Pecan Chicken Salad

(I couldn’t find the actual Valley Natural Foods recipe for this salad, so I used the ingredients list from the deli container and adapted a recipe found at http://www.annies-eats.com/2009/07/15/cranberry-pecan-chicken-salad/  )

Ingredients

  • 4 cups of cubed cooked chicken
  • 1 cup toasted pecans, coarsely chopped
  • 1 rib celery, finely diced
  • 2-4 tbsp. finely minced shallot or scallion
  • 1 cup dried cranberries
  • 1/3 cup light mayonnaise
  • 2 tbsp. minced flat-leaf parsley
  • 1/2 tsp. salt
  • 1/2 tsp. pepper

Directions

Combine all ingredients in large mixing bowl.  Mix well until thoroughly combined.  Adjust seasonings to taste.  Refrigerate for 30 minutes or more to allow flavors to meld.  Serve.


Enjoy these recipes!  Have fun with them and report and interesting variations in the comments.

Share

GF Vegan Oatmeal Raisin Cookies

Oatmeal Raisin Cookies

adapted from Gluten-Free Baking Classics by Annalise Roberts

Oatmeal Raisin Cookies, gluten-free, vegan

I LOVE Oatmeal Raisin Cookies!  For me, they are the perfect autumn treat—spicy, chewy, yummy.  And ever since I accidentally fed some vegans my chocolate chip cookies (I forgot that eggs are an animal product), I’ve been looking for an opportunity to try out some of the egg substitutes.  The two options used most frequently seem to be flax gel and applesauce.  (There’s also something that comes in a box, but it doesn’t appear to be corn-free, so will avoid that option.) For this recipe, I used flax gel (details below) and it worked great!

Yippee!  I now have a treat I can bring to gatherings including vegans.

Makes about 30 cookies; recipe can be doubled.

Ingredients

  • 1/2 cup Superfine Brown Rice Flour (I use Authentic Foods brand)
  • 1/4 cup tapioca starch/flour
  • 1/4 cup potato starch (not potato flour)
  • 1 teaspoon baking powder
  • 1/2 teaspoon baking soda
  • 3/8 teaspoon guar gum
  • 1/4 teaspoon salt
  • 1/2 teaspoon cinnamon
  • 1/4 teaspoon nutmeg
  • 1/4 teaspoon ginger
  • 1 Tablespoon flax meal (I buy whole flax seeds and grind them myself)
  • 3 Tablespoons boiling water
  • 1/2 cup shortening plus 1 Tablespoon water
  • 1/2 cup brown sugar
  • 1/2 cup white sugar
  • 1/2 Tablespoon vanilla
  • 1 cup gluten-free quick oats (I use Bob’s Red Mill brand)
  • 1/2 cup raisins

Directions

  1. Preheat oven to 350°F. Position rack in the center of oven.  Grease cookie sheet with a thin coating of shortening or cooking spray.
  2. Combine flours/starches, baking powder, baking soda, guar gum, salt, and spices in a medium bowl.  Whisk together.
  3. Make flax gel (egg substitute) by combining flax meal and boiling water in a small bowl.  Stir together and let sit for 10 minutes or until gelled.
  4. In a large mixing bowl, beat shortening & 1 Tablespoon water, brown sugar, and white sugar until light and creamy.  Add flax gel and vanilla.  Mix until smooth.
  5. Gradually add the flour mixture.  Beat until smooth.
  6. Stir in the oats and raisins. (I recommend doing this with a wooden spoon rather than the mixer.)
  7. Drop heaping teaspoons of dough onto greased cookie sheet.  Bake in center of oven for 16-18 minutes or until golden brown.  Allow to cool briefly (less than five minutes). Transfer to wire rack and cool completely.  Store in an airtight container.

Enjoy!!

©2012 Lucinda DeWitt

Share

Indian Delights

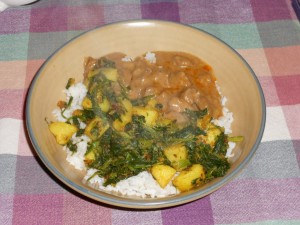
Rogan Josh and Saag Aloo
(Lamb Stew and Spinach with Potatoes)


Over the summer I bought some lamb from Sheepy Hollow at Native Oaks Farm when I was at the Midtown Farmer’s Market.  Last week I finally got around to using it.  And now I am finally typing up the recipes.  These are gluten-free and dairy-free versions of two classic Indian dishes.  I served them with basmati rice.

Rogan Josh

adapted from recipes found in Madhur Jaffrey’s Indian Cooking (1982), Good Cooking from India by Shahnaz Mehta with Joan Bravo Korenblit (1981), and on the jar of Rogan Josh spice blend from Penzey’s Spices.

Rogan Josh is a popular lamb dish from Northern India/Persia/Kashmir.

This recipe makes 6-8 servings; can be halved.

Ingredients

  • 2 lb. lamb shoulder or stew beef, cut into small cubes (1/2″-3/4″)
  • 2 Tablespoons vegetable oil, divided
  • 1 large onion, thinly sliced
  • 2″ piece of ginger root, peeled & grated
  • 3-4 cloves garlic, minced
  • 2-4 Tablespoons Rogan Josh seasoning (see note)
  • 1 teaspoon salt
  • 1/2-1 cup water (see note)
  • 1/2 cup coconut milk (see note)
  • 2 Tablespoons coconut manna (optional)

Directions

  1. Preheat oven to 350°F.
  2. Heat a Dutch oven (or other large pan that can go from stovetop to oven) over medium-high heat. Brown the lamb in 1 Tablespoon of the oil.  Remove the meat.
  3. Add 1 Tablespoon oil to the pan.  Add onions and sauté for several minutes, until transparent.
  4. Add Rogan Josh seasoning, salt, ginger, and garlic and sauté for 1-2 minutes.
  5. Return meat to pan. Slowly blend in water, coconut milk, and coconut manna.  Bring to a simmer.
  6. Cover and place in the pre-heated oven.  Cook for 1-2 hours or until very tender.  Stir occasionally and add more water if necessary.

Notes

  • Rogan Josh seasoning is a blend of paprika, garlic, ginger, cumin, coriander, black pepper, cayenne pepper, cinnamon, cardamom, cloves, and saffron.  I buy mine at Penzey’s Spices.  Feel free to create your own blend from a combination of these spices.
  • The original recipe used yogurt instead of coconut milk & coconut manna.  This recipe is a dairy-free version.  I use Nutiva Coconut Manna™.
  • You may want start with a smaller amount of water and add more later if needed.  If the sauce seems too thin after cooking, you can always thicken it a bit before serving.  Simply return the pan to the stovetop and stir in 1-2 Tablespoons of flour mixed with 2-3 Tablespoons of cold water. (I use a gluten-free flour blend, but any standard “thickener” will do (arrowroot starch, corn starch, etc.).  Heat & stir until thickened.

While the Rogan Josh is in the oven, prepare the Saag Aloo.

Saag Aloo

(Indian Spinach and Potatoes)

adapted from recipes found in Madhur Jaffrey’s Indian Cooking (1982), Good Cooking from India by Shahnaz Mehta with Joan Bravo Korenblit (1981), and the local coop sale flyer

Serves 4-5
Ingredients

  • 10 ounces fresh or frozen spinach
  • 1 pound potatoes
  • 4 Tablespoons oil
  • 1 cup yellow onion, diced
  • 1/2-1 fresh jalapeño pepper, minced
  • 2 cloves garlic, minced
  • 1/2 teaspoon ground turmeric
  • 1/2 teaspoon ground cumin
  • 1 teaspoon ground coriander
  • 1/2 teaspoon garam masala
  • 1/2 teaspoon salt
  • 2 Tablespoons lime or lemon juice
  • 3 Tablespoons water

 Directions

  1. If using fresh spinach, chop roughly, then sauté in a bit of oil until wilted.  If using frozen spinach, thaw and drain using a sieve or by squeezing in your hand to remove most of the water; then heat in microwave or sauté pan.
  2.  In a medium-sized pot bring 1-2 quarts of salted water to a boil.  Peel and cut the potatoes into bite-sized chunks; add them to the boiling water and cook for about 7 minutes.  (You’re just parboiling them; they will cook more in the skillet.) Remove them from the heat, drain, and set aside.
  3. Heat the oil in a large skillet over medium-high heat.  Add the onions and pepper and sauté for a few minutes until limp.  Add the parboiled potatoes and fry for about 8-12 minutes or until they begin to brown.  Turn down the heat;   Add the garlic and spices; sauté for 1-2 minutes until fragrant.  Add the spinach, lime/lemon juice and water; cook, stirring frequently, until all is combined and hot. Serve hot.

©2012 Lucinda DeWitt

Share

Pie Crust Troubles

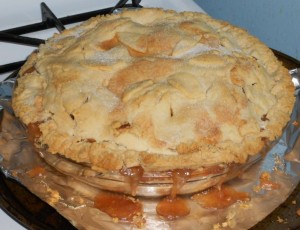
gluten-free apple pie

Autumn is here, so it’s time to start baking again!

This weekend I made Quinoa-Sesame Bread, Minestrone Soup (minus the parmesan), and a Gluten-Free Apple Pie.  YUMMO!!

Unfortunately, something went wrong with my gluten-free pie crust recipe (see below).  I thought I followed the recipe I had used before, but for the first time, I made it a day before I was going to use it.  I wrapped it in plastic wrap and stored it in the frig overnight.  Today it was much more stiff and crumbly.  Even adding water didn’t make it nice and pliable like it usually is.  As you can see above, I used it anyway . . . patching it together.  I include the recipe below (it usually works). Just a WARNING that if you need to make the pie crust dough ahead, it may be more difficult to work with the next day.  (This makes sense because guar gum absorbs moisture, and continues to absorb moisture even after baking.  This is why GF baked goods shrink over time.)  I will post updates as I continue to tweak this recipe.

Gluten-Free Pie Crust

Single Crust Double Crust
1-1/4 cup Brown Rice Flour Mix 2-1/2 cup Brown Rice Flour Mix
2 tablespoons sweet rice flour 1/4 cup sweet rice flour
1 tablespoon sugar 2 Tablespoons sugar
1/2 teaspoon guar gum 1 teaspoon guar gum
1/4 teaspoon salt 1/2 teaspoon salt
8 tablespoons (1/2 cup) solid shortening, separated into 8 pieces and chilled 1 cup solid shortening, separated into pieces and chilled
1 egg 2 eggs
1 tablespoon orange juice or lemon juice 2 Tablespoons orange juice or lemon juice
  1. Preheat oven to 375°F.
  2. Mix the flours, sugar, guar gum and salt in a food processor.
  3. Add solid shortening and pulse until crumbly and evenly distributed.  The mixture should look like coarse crumbs.
  4. Add egg and orange or lemon juice.  Pulse a few times until the dough comes together.
  5. Dump dough out onto a large sheet of plastic wrap.  Form into a ball and gently flatten into a disc.  If making a double crust, divide into two discs. At this point you can wrap the dough in plastic wrap and chill in the frig until you need it.
  6. On a large cutting board or table, roll out the dough between two sheets of plastic wrap.  If dough seems sticky, dust with rice flour and/or refrigerate the dough before rolling.  Keep rolling until the dough is larger than your pie pan.
  7. Remove top sheet of plastic wrap and invert the dough into the prepared pan.  Don’t worry if you get a few tears; just press it back together with your fingertips.
  8. Partially bake bottom crust (optional): Prick the pastry in 3 or 4 places with a fork.  Partially bake the crust for 10 minutes.  Remove from oven.  Cool.  Fill and continue as directed in particular recipe.

 Apple Pie

  • 3 pounds apples (a mix of granny smith and other sweeter apples works best), peeled, quartered, cored, and sliced
  • 1-2 Tablespoons lemon and/or orange zest
  • 2 Tablespoons lemon juice
  • 3/4 cup sugar
  • 1/4 cup gluten-free Rice Flour Blend
  • 1 teaspoon guar gum
  • 1 teaspoon ground cinnamon
  • 1/2 teaspoon ground nutmeg
  • 1/4 teaspoon ground ginger
  • GF Pie Crust for two-crust pie (see above)
  • non-dairy milk and sugar for topping (optional)
  1. Preheat the oven to 400°F.
  2. Combine apples with zests, juice, 3/4 cup sugar, flour, gum, cinnamon, nutmeg, and ginger.  Stir well.
  3. Roll out half the pie dough between two sheets of plastic wrap (see instructions above).  Drape gently into pie plate extending about 1/2-inch over the rim.
  4. Fill the pie with the apple mixture. Top with the second crust and seal the edges.  Make several slits in top crust with a knife.  Brush with non-dairy milk and sprinkle with sugar.
  5. Place the pie pan on a baking sheet lined with tin foil (to catch any drips).  Bake for 10 minutes at 400°F, then turn down the oven to 375°F and bake for 60-70 minutes more or until the crust is browned and the juices begin to bubble.  If the edges of the crust start to get too brown, cover with tin foil.
  6. Cool on a wire rack.
Share