Adzuki Beans & Yam Hash

Several months ago I bought some adzuki beans with the thought of making homemade gluten-free hoisin sauce and other asian condiments.  Never got around to that, but last week saw several recipes using adzuki beans over at nourishingmeals.com.

Considered a adzuki bean and rice salad, but then our weather got cold, so I went with Adzuki Bean and Yam Hash.  I’m not on the elimination diet, mentioned in the recipe, so I made a few minor changes; it turned out pretty yummy and healthy!

First, I soaked 1-1/2 cups of adzuki beans overnight.  Sources differ on whether or not to soak adzukis and how long to cook them (40 minutes – 2 hours!).  I used my never-fail  method of starting them on the stove top and then finishing them in the oven.  To help with the “beano problem” I rinsed the beans several times after soaking and then threw in a 5″ strip of Kombu seaweed during the last 20 minutes of cooking (mine took 60 minutes in the oven).

While the beans were cooking I cooked some brown rice using Saveur’s Perfect Brown Rice method.  When the beans were done, I took advantage of the hot oven to bake a large sweet potato.  The Adzuki Bean and Yam Hash recipe has you dice the yam very tiny and then cook it in the skillet, but it warns of possible burning, so it seemed easier for me to bake the potato (at least partially) ahead of time.  And while that was happening I chopped the red chard I used instead of the collard greens.

So, most of my prep work was all done early in the day so I could rest for several hours before doing the rest of the cooking.

Here’s my version of the recipe:

Adzuki Bean & Yam Hash

Ingredients

  • 2 Tbls extra virgin olive oil
  • 1 medium onion, diced
  • 1 large yam, baked, cooled, then peeled and diced
  • 1 tsp dried thyme
  • 2 tsp ground cumin
  • 2 cups cooked adzuki beans
  • 5 large red chard leaves, finely chopped*
  • Italian Herb blend and black pepper to taste
  • prepared Long Grain Brown Rice (to serve over)

Directions

  1. Heat a large skillet over medium heat.  Add the oil.  Once the oil is hot add the onions and a dash of salt.  Sauté for a few minutes until tender.
  2. Add the yams, thyme and cumin.  Sauté for a few minutes uncovered and then cover and cook for 5 more minutes (see Note).  Stir occasionally and check for sticking and/or burning.
  3. Add adzuki beans.  Sauté a few minutes more or until the beans are re-warmed, 5-10 minutes.  Add the chard.  Cover the pan and leave to steam and wilt the chard (about 5 minutes).  Sauté everything together.
  4. Add Italian Herb blend and pepper to taste.
  5. Serve over rice.

Makes approximately 4 servings.

Note

  • Cooking times will depend in part on whether your yams and beans are still warm (and thus just reheating).  Adjust as needed in order to get everything hot.

Share

Use your Tools!

Yesterday I added a page on Cooking with CFS.  Later I realized that I didn’t mention how tools & equipment can simplify cooking.  Of course this is probably because I don’t have much fancy equipment (bread machine, stand mixer—mine broke trying to knead GF Bread Dough) and what I do have (food processor, mini-choppers, blender) I often don’t use because all those parts add more cleanup time . . .

But this morning I made some Carrot Ginger Soup and realized (given that everything gets puréed at the end) I could slice/shred all the veggies in the food processor and reduce my prep time.  It worked pretty well.  In fact, shredding the potatoes (I used one red and one sweet potato this time) also reduced the purée time at the end . . . so a double time/energy saver!

In addition, this recipe uses my favorite little ginger grater:

AND my immersion blender:

So always remember to use your tools!

Enjoy!

© 2012, Highly Sensitive Girl

Share

B is for Baseball, Brats, Buns

Thursday was the start of the baseball season (at least for Chicago Cubs fans).  I knew I was going to have to figure out a GF, DF, and corn-syrup-free alternative to Hot Dogs/Brats . . . turned out to be trickier than I expected.  According to the guy at my local meat counter, in order to be a “brat,” and not some other kind of sausage, the sausage must contain milk . . . who knew?  Not me.  Seward Co-op has a great meat department where they make their own sausages, most of which I can eat . . . my favorite are Umbrian (with raisins & pine nuts) and Lime-Mango Chicken Sausage, but neither of those will do as a substitute for a baseball brat, and no-go on dairy-free brats  . . . so I ended up buying Polish Sausages instead.

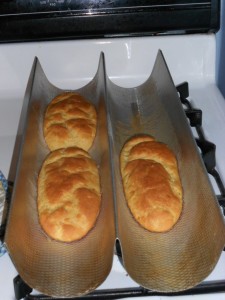
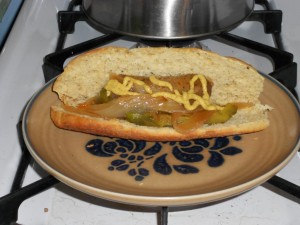
I sautéed some onions and peppers and served the sausage over rice with the onions & peppers . . . but it wasn’t quite what you want to accompany a ball game.  So this morning I decided to try to bake some Gluten-Free Hot Dog Buns.  I used Annalise Roberts’ recipe from Gluten-Free Baking Classics.  The pan I have is an Italian Bread pan (rather than the thinner baguette pan recommended in the recipe) . . . so the buns were a bit flat . . . but they worked!!

So this afternoon I had sausage/onions/peppers on a GF bun while listening to the Twins game on the radio . . .

Sausage on a GF Bun

To paraphrase Field of Dreams:
Is this heaven?
No, it’s baseball.
No contradiction intended.

Share

GF Carrot Cake Bake-Off

Gluten-Free Carrot Cake Bake-off

March 30, 2012

Apparently when I’m feeling a bit down, I cook.  Seem to be doing alot of it lately.  A few days ago I needed some dessert and couldn’t decide between two GF carrot cake recipes.  SO, I made two 9″ round cakes, one of “The Best Carrot Cake” from Beth Hillson’s Gluten-free Makeovers, the other from Annalise Roberts’ Gluten-Free Baking Classics .  I calculated a half-batch of each recipe, baked them both at the same time, and then compared them both with and without a basic powdered sugar frosting.

YUMMO!!

Unfortunately for those wanting recipes, I didn’t make enough changes to the original recipes to feel justified in posting them here.  Both cookbooks were readily available at my public library (though I now own Roberts’ book and will probably buy HIllson’s soon as well).

For now I will try to describe the recipes in enough detail for you to know whether you would like to pursue them . . . trust me, they bake up good enough for non-GF-folks to eat!

Hillson’s recipe uses a flour blend of sorghum, rice flour, and tapioca flour combined with relatively small amounts of gum, baking soda, baking powder, and salt, spiced with cinnamon, nutmeg, & cloves.  These dry ingredients are combined with sugar, oil, and eggs.  Grated carrots, crushed pineapple, raisins and walnuts are then stirred in.

Roberts’ recipe uses her Brown Rice Flour Blend (super-fine brown rice flour, potato starch, & tapioca starch); somewhat larger amounts (compared to Hillson) of gum, baking powder, baking soda, salt, spiced with cinnamon and nutmeg.  These dry ingredients are combined with sugar, oil, eggs, and vanilla.  Grated carrots, walnuts, and coconut are then stirred in.

The only modifications I made to the recipes were:

  • guar gum instead of xanthan gum
  • rehydrated unsweetened coconut instead of sweetened
  • reduced the amount of pineapple juice to adjust for moisture introduced by the extra 1/2 egg (half of 3 eggs became 2 eggs 🙂  )
  • baked for an extra 7 minutes because the centers were not firm after the listed baking times

I used my Farberware non-stick cake pans greased and lined with parchment circles.  I also used my Velcro insulated pan wraps (which keep cakes from doming and worked equally well with these GF cakes as they did with regular cakes).  In the picture above, the cake in the front-left is Hillson’s and the one in the back-right is Roberts’.

After tasting each of the cakes to make sure they were edible and compatible with each other, I stacked them and frosted with my Non-Dairy Coconut Powdered Sugar Frosting. (rather tricky after you’ve already cut into the cakes!)

Non-Dairy Coconut Powdered Sugar Frosting

  • 1/2 cup vegetable shortening (I use Spectrum Organics Palm Oil Shortening)
  • 2 Tbls Coconut Manna (I use Nutiva brand)
  • 2-3 cups confectioners sugar; sifted if lumpy
  • 1 tsp pure vanilla extract
  • 1/2 tsp lemon extract
  • dashes of lemon juice or water or “milk” substitute as needed to thin the frosting
  1. Beat the shortening and coconut manna until light and fluffy.  Add extracts and beat again.
  2. Gradually add confectioners’ sugar and mix at low-medium speed until combined.
  3. Add liquid, one teaspoon at a time, to thin the frosting enough to use.

Note: The coconut manna provides some richness to make up for not using the butter and cream cheese that would be in the traditional version of my powdered sugar frosting.

GENERAL NOTES

  • The recipe in Hillson’s book is VERY different from one you might find posted online (http://adventures-in-gluten-free-wheat-free-living.yumsugar.com/Beths-Gluten-Free-Easy-Carrot-Cake-2905567 ).  I haven’t tested the online version.
  • Roberts’ recipe has been posted here http://www.theculinarylife.com/2009/easy-gluten-free-carrot-cake-recipe/
  • Overall, I preferred the texture and taste of Hillman’s recipe (lower cake in photo below) over Roberts’ (upper cake in photo below).  Hillman’s was sweeter, moister, and spicier. Hillman’s recipe does not rise as much as Roberts (due to smaller amounts of leavening), so next time I would use Hillman’s recipe, but substitute the baking powder and baking soda amounts from Roberts’.  I might also be tempted to toss in the unsweetened coconut as well. 🙂  Roberts’ cake tasted more like what I think of as “carrot/spice cake from a box”.  Edible, even tasty, just not as rich as I wanted in a carrot cake.

Share